老铁记得 转发 ,猫哥会呈现更多 Flutter 好文~~~~
微信 flutter 研修群 ducafecat
原文
https://medium.com/flutterdevs/how-to-get-unique-device-details-in-flutter-ced2dbe5f8e5
猫哥说
获取设备 id 是每一个 APP 都应该去做的,比如你访问唯一用户统计就需要。
前言
代码
https://github.com/flutter-devs/flutter_device_details_demo
参考
正文
一般来说,制作一个移动应用程序是一个极其令人难以置信和测试的任务。有许多可用的框架,这些框架为创建移动应用程序提供了极好的亮点。为了创建移动应用,Android 提供了一个基于 Java 和 Kotlin 语言的本地结构框架,而 iOS 提供了一个依赖于 Objective-C/Swift 语言的系统。
随后,我们需要两种独特的语言和结构来为这两种操作系统创建应用程序。今天,为了打破这种错综复杂的结构,已经提出了几个框架来帮助桌面应用程序同时使用这两种操作系统。这类框架被称为 cross-platform 跨平台开发工具。
在这个博客,我们将探索如何获得独特的设备细节.我们将实现一个演示程序,并获得独特的设备细节,为安卓和 IOS 使用设备信息包在您的 Flutter 应用程序。
简介
Flutter 中得到当前设备数据的应用。如何利用 device_info plugin 为 Android 和 IOS 提供独特的设备细节。在这一点上,当我们谈论一个独特的设备细节在本地,我们有 Settings.Secure.ANDROID_ID 获得一个独一无二的设备细节。
https://pub.dev/packages/device_info
演示
这个演示视频显示了如何获得一个独特的设备细节的 Flutter 。它显示了如何设备细节将工作使用设备信息包在您的 Flutter 应用程序。它会显示用户何时点击触发按钮,屏幕上显示的唯一设备 Andriod/Ios 信息,如设备名称、版本、标识符等。它会显示在你的设备上。
实施
将依赖项添加到 pubspec ー yaml 文件。
1
2
3
4
| dependencies:
flutter:
sdk: flutter
device_info: ^0.4.0+4
|
1
| import 'package:device_info/device_info.dart';
|
- 第三步: 在应用程序的根目录中运行 flutter 软件包。
代码实现
如何实现 dart 文件中的代码:
在 lib 文件夹中创建一个新的 dart 文件,名为 device_detail_demo.dart。
首先,我们将创建一个用户界面。在主体部分,我们将添加一个中心小部件。在内部,我们将添加一个列小部件。在这个小部件中,我们将添加一个 mainAxisAlignmnet 为中心。它是 children’s property ,添加 RaisedButton()。在这个按钮中,我们将添加填充、颜色和 OnPressed 功能。它的子属性,我们将文本“Device Details”。
1
2
3
4
5
6
7
8
9
10
11
12
13
14
| Center(
child: Column(
mainAxisAlignment: MainAxisAlignment.center,
children: [
RaisedButton(
padding: EdgeInsets.all(14),
color: Colors.cyan[50],
onPressed: (){},
child: Text("Device Details",
style: TextStyle(color: Colors.black),),
),
],
),
),
|
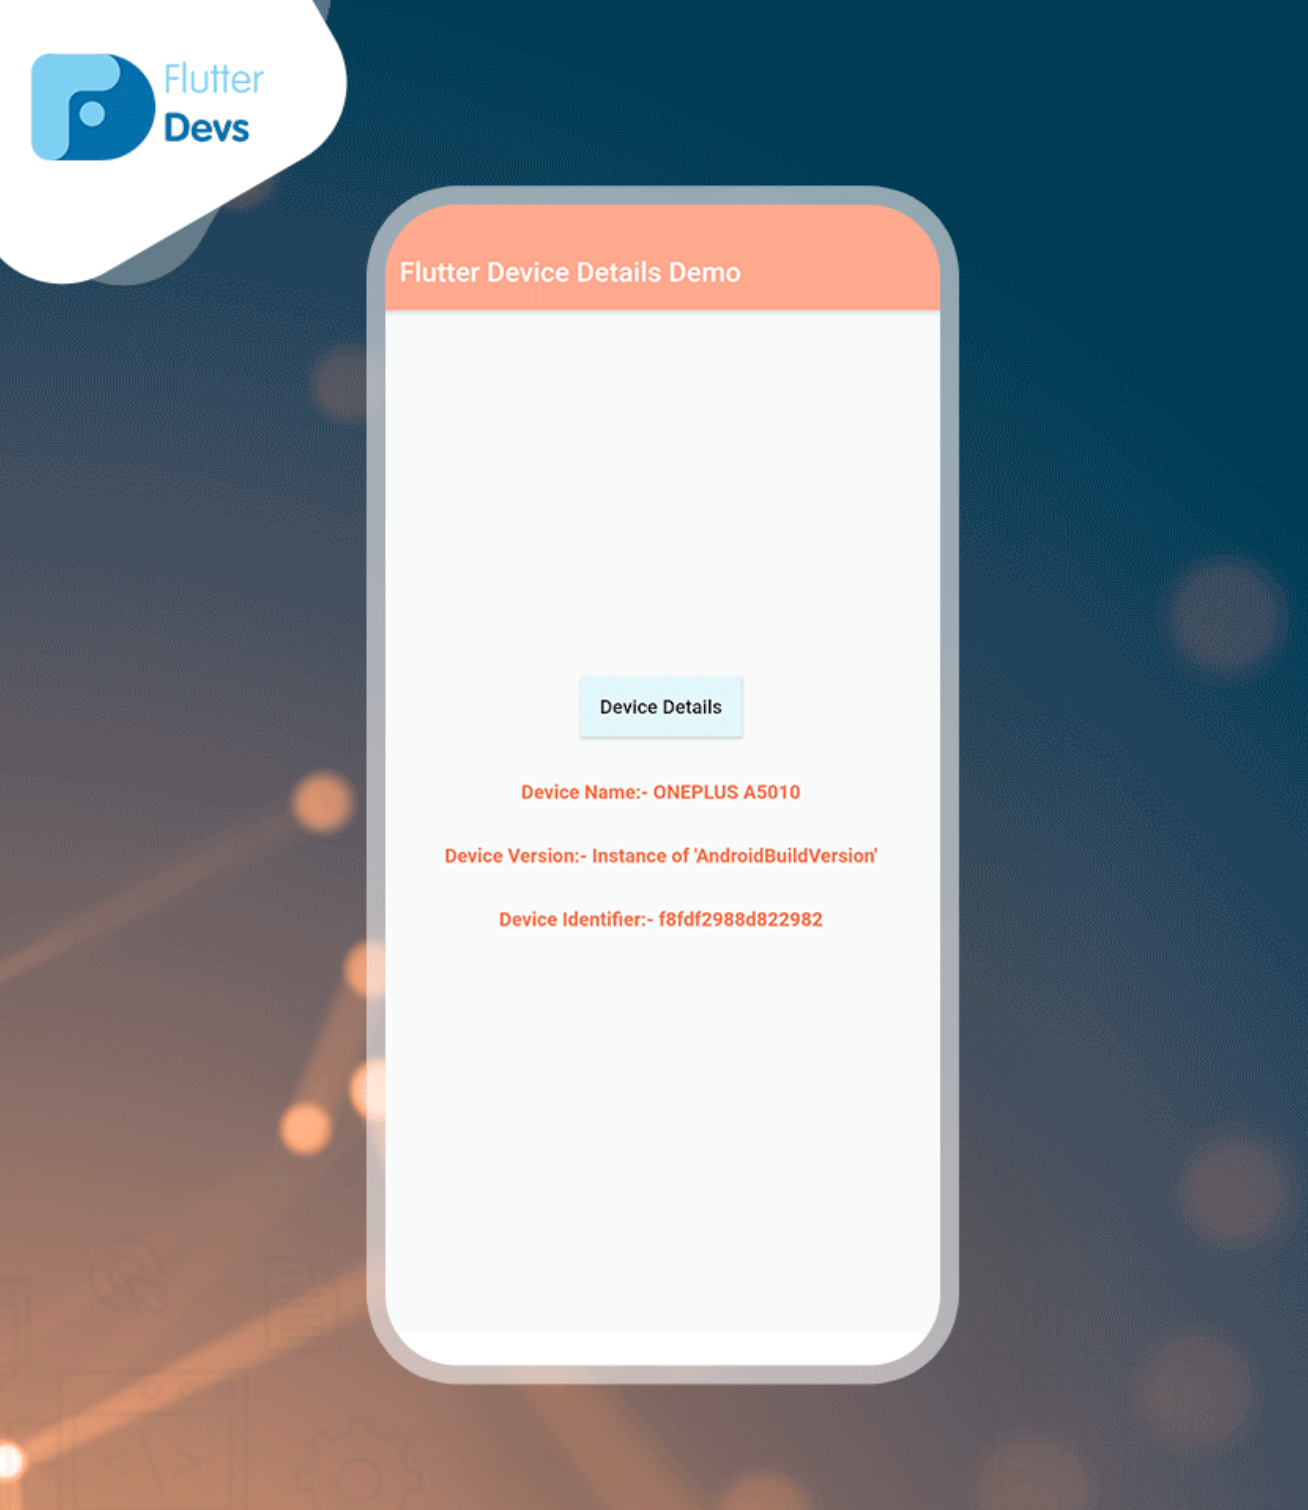
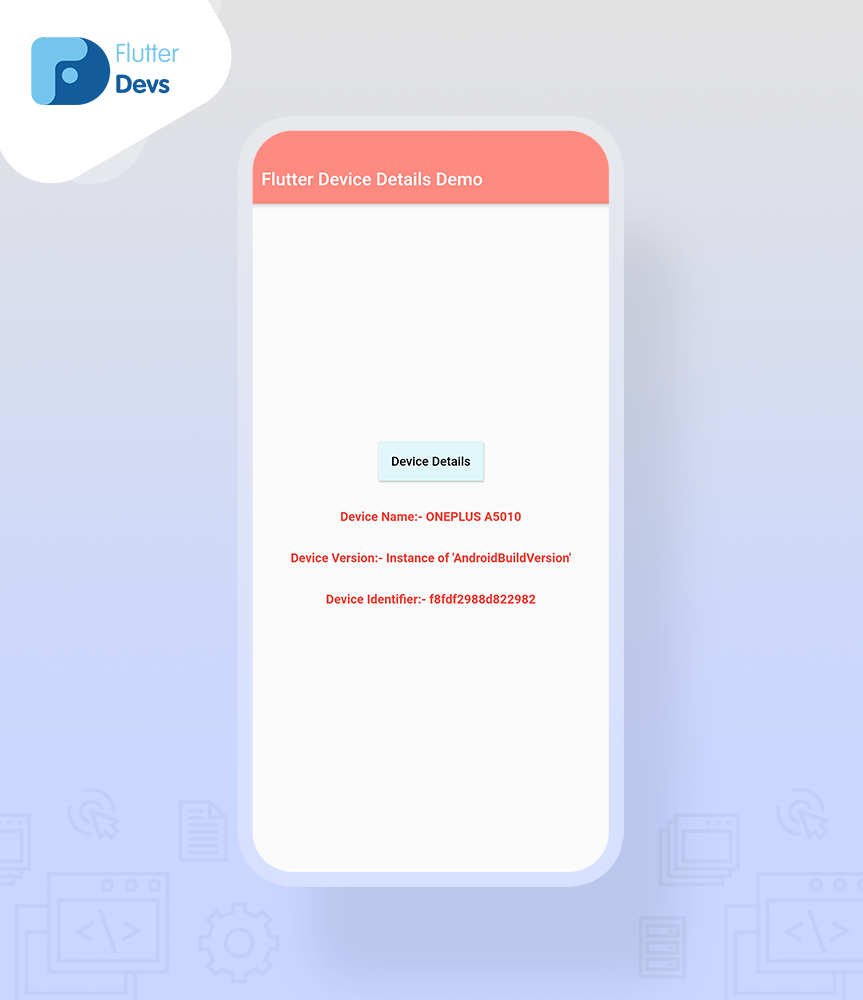
当我们运行应用程序时,我们应该得到屏幕的输出,就像下面的屏幕截图一样。
我们将创建三个字符串 deviceName、 deviceVersion 和 identifier。
1
2
3
| String deviceName ='';
String deviceVersion ='';
String identifier= '';
|
现在,我们将添加程序的主函数。我们将添加 future _deviceDetails() 在内部,我们将添加一个最终的 deviceinfoplgin 等于新的 deviceinfoplgin()。我们将添加 try {} 方法,并为平台导入 dart:io。
如果平台是 Andriod,那么构建就等于 deviceInfoPlugin 对于 Andriod 信息。添加 setState ()方法。在这个方法中,我们将所有的字符串加起来等于构建。如果平台是 Ios,那么构建版本就等于 Ios 信息的 deviceInfoPlugin。添加 setState ()方法。在这个方法中,我们将所有的字符串加起来等于构建。
1
2
3
4
5
6
7
8
9
10
11
12
13
14
15
16
17
18
19
20
21
22
23
24
| Future<void>_deviceDetails() async{
final DeviceInfoPlugin deviceInfoPlugin = new DeviceInfoPlugin();
try {
if (Platform.isAndroid) {
var build = await deviceInfoPlugin.androidInfo;
setState(() {
deviceName = build.model;
deviceVersion = build.version.toString();
identifier = build.androidId;
});
} else if (Platform.isIOS) {
var data = await deviceInfoPlugin.iosInfo;
setState(() {
deviceName = data.name;
deviceVersion = data.systemVersion;
identifier = data.identifierForVendor;
});
}
} on PlatformException {
print('Failed to get platform version');
}
}
|
我们将为 PlatformException 导入服务
1
| import 'package:flutter/services.dart';
|
现在,我们将在引发的按钮上添加按下的函子上的 _deviceDetails()
1
2
3
| onPressed: (){
_deviceDetails();
},
|
我们将添加设备版本、名称和标识符不是空的,然后显示 Column 小部件。在这个小部件中,我们将添加所有三个文本,如设备名称、设备版本和设备标识符将显示在您的设备上。否则,显示一个空容器。
1
2
3
4
5
6
7
8
9
10
11
12
13
14
15
16
17
18
19
| deviceVersion.isNotEmpty && deviceName.isNotEmpty
&& identifier.isNotEmpty?
Column(
children: [
SizedBox(height: 30,),
Text("Device Name:- "+deviceName,style: TextStyle
(color: Colors.red,
fontWeight: FontWeight.bold)),
SizedBox(height: 30,),
Text("Device Version:- "+deviceVersion,style: TextStyle
(color: Colors.red,
fontWeight: FontWeight.bold)),
SizedBox(height: 30,),
Text("Device Identifier:- "+identifier,style: TextStyle
(color: Colors.red,
fontWeight: FontWeight.bold)),
SizedBox(height: 30,),
],
): Container(),
|
当用户点击按钮,然后,所有三个数据将显示在您的设备上。当我们运行应用程序时,我们应该得到屏幕的输出,就像下面的屏幕截图一样。
代码文件
1
2
3
4
5
6
7
8
9
10
11
12
13
14
15
16
17
18
19
20
21
22
23
24
25
26
27
28
29
30
31
32
33
34
35
36
37
38
39
40
41
42
43
44
45
46
47
48
49
50
51
52
53
54
55
56
57
58
59
60
61
62
63
64
65
66
67
68
69
70
71
72
73
74
75
76
77
78
79
80
81
82
83
84
85
86
87
88
89
90
| import 'dart:io';
import 'package:device_info/device_info.dart';
import 'package:flutter/cupertino.dart';
import 'package:flutter/material.dart';
import 'package:flutter/services.dart';
class DeviceDetailDemo extends StatefulWidget {
@override
_DeviceDetailDemoState createState() => _DeviceDetailDemoState();
}
class _DeviceDetailDemoState extends State<DeviceDetailDemo> {
String deviceName ='';
String deviceVersion ='';
String identifier= '';
Future<void>_deviceDetails() async{
final DeviceInfoPlugin deviceInfoPlugin = new DeviceInfoPlugin();
try {
if (Platform.isAndroid) {
var build = await deviceInfoPlugin.androidInfo;
setState(() {
deviceName = build.model;
deviceVersion = build.version.toString();
identifier = build.androidId;
});
} else if (Platform.isIOS) {
var data = await deviceInfoPlugin.iosInfo;
setState(() {
deviceName = data.name;
deviceVersion = data.systemVersion;
identifier = data.identifierForVendor;
});
}
} on PlatformException {
print('Failed to get platform version');
}
}
@override
Widget build(BuildContext context) {
return Scaffold(
appBar: AppBar(
backgroundColor: Colors.redAccent[100],
title: Text("Flutter Device Details Demo"),
automaticallyImplyLeading: false,
),
body: Center(
child: Column(
mainAxisAlignment: MainAxisAlignment.center,
children: [
RaisedButton(
padding: EdgeInsets.all(14),
color: Colors.cyan[50],
onPressed: (){
  _deviceDetails();
},
child: Text("Device Details",
style: TextStyle(color: Colors.black),),
),
deviceVersion.isNotEmpty && deviceName.isNotEmpty
    && identifier.isNotEmpty?
Column(
  children: [
    SizedBox(height: 30,),
    Text("Device Name:- "+deviceName,style: TextStyle
      (color: Colors.red,
        fontWeight: FontWeight.bold)),
    SizedBox(height: 30,),
    Text("Device Version:- "+deviceVersion,style: TextStyle
      (color: Colors.red,
        fontWeight: FontWeight.bold)),
    SizedBox(height: 30,),
    Text("Device Identifier:- "+identifier,style: TextStyle
      (color: Colors.red,
        fontWeight: FontWeight.bold)),
    SizedBox(height: 30,),
  ],
): Container(),
],
),
),
);
}
}
|
总结
在本文中,我解释了如何获得独特的设备细节 Flutter 的基本结构,您可以根据自己的选择修改这个代码。这是一个小的介绍,以获得独特的设备细节的用户交互从我这边,它的工作使用 Flutter。
© 猫哥
https://ducafecat.tech/
https://github.com/ducafecat
往期
开源
GetX Quick Start
https://github.com/ducafecat/getx_quick_start
新闻客户端
https://github.com/ducafecat/flutter_learn_news
strapi 手册译文
https://getstrapi.cn
微信讨论群 ducafecat
系列集合
译文
https://ducafecat.tech/categories/%E8%AF%91%E6%96%87/
Dart 编程语言基础
https://space.bilibili.com/404904528/channel/detail?cid=111585
Flutter 零基础入门
https://space.bilibili.com/404904528/channel/detail?cid=123470
Flutter 实战从零开始 新闻客户端
https://space.bilibili.com/404904528/channel/detail?cid=106755
Flutter 组件开发
https://space.bilibili.com/404904528/channel/detail?cid=144262
Flutter Bloc
https://space.bilibili.com/404904528/channel/detail?cid=177519
Flutter Getx4
https://space.bilibili.com/404904528/channel/detail?cid=177514
Docker Yapi
https://space.bilibili.com/404904528/channel/detail?cid=130578
邮箱 ducafecat@gmail.com / 微信 ducafecat / 留言板 disqus