原文
https://medium.com/flutterdevs/draggable-floating-action-button-in-flutter-2149a7e47f06
参考
正文
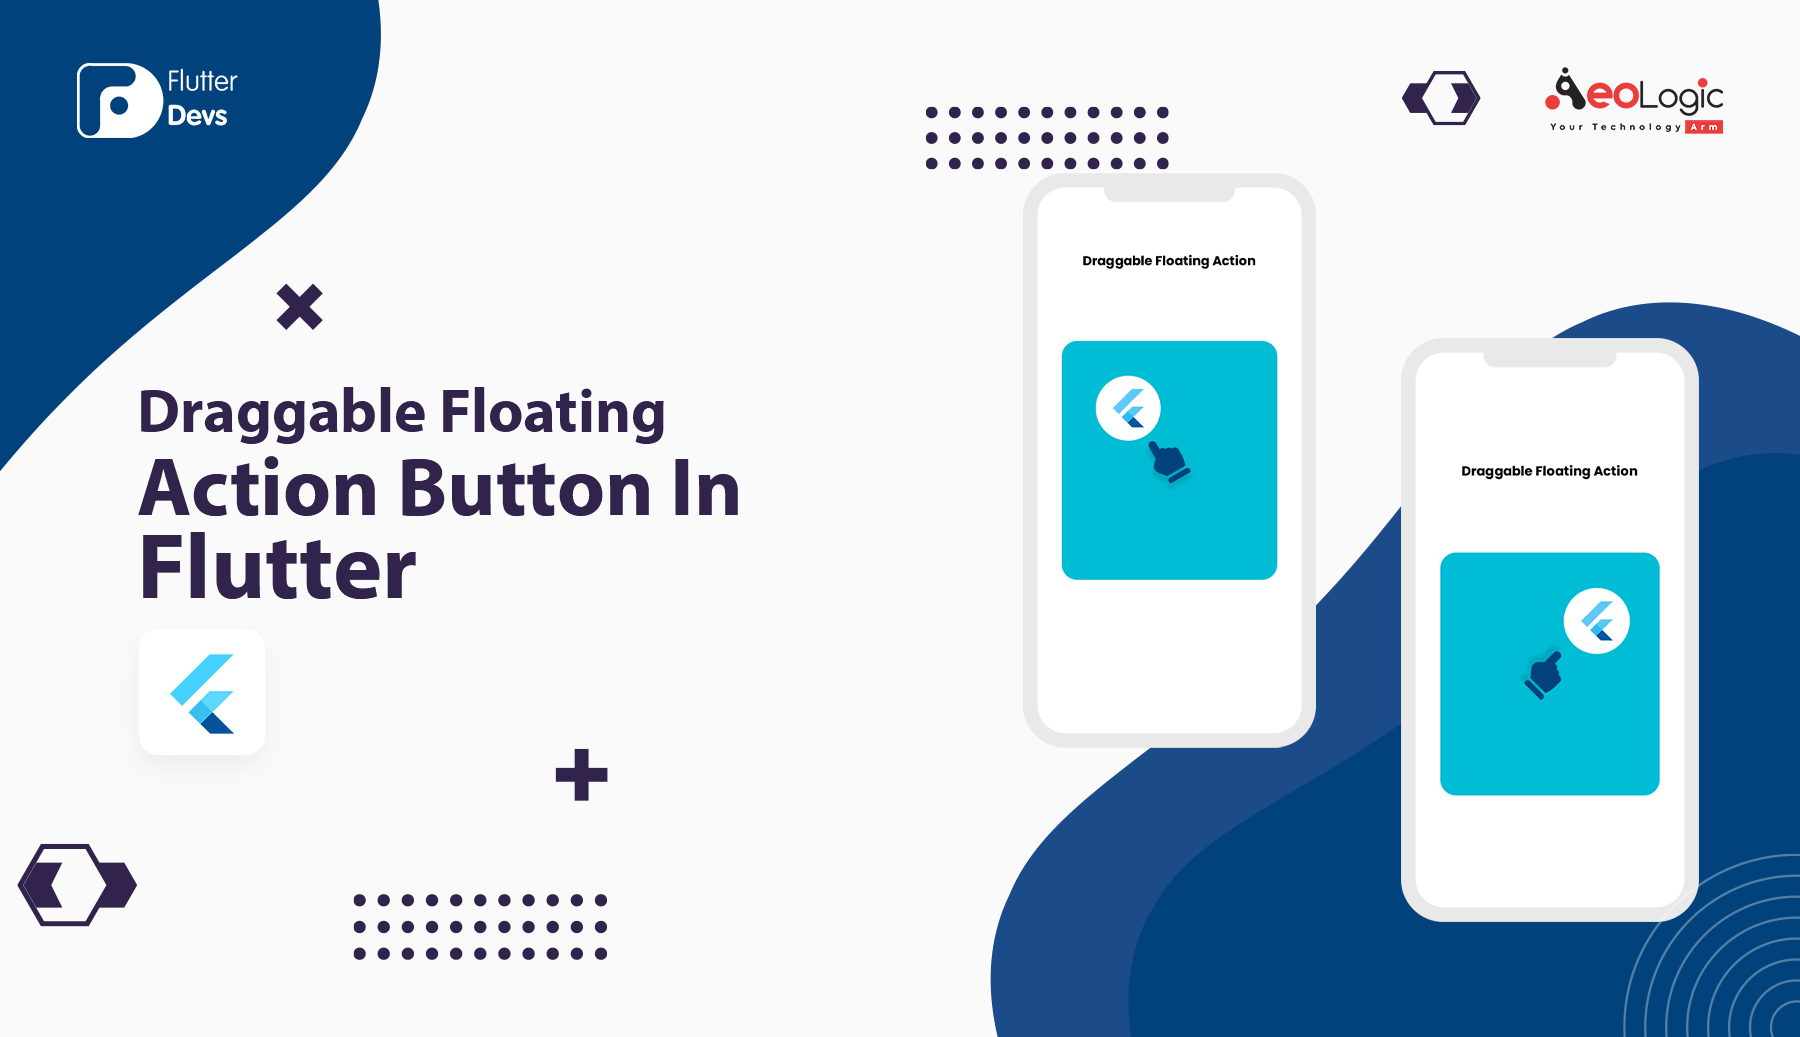
Flutter 允许您使用 FloatingActionButton 小部件添加一个浮动操作按钮。尽管如此,它不允许你拖动按钮。考虑一下你需要让它可拖动的可能性。本文有一个模型,它公开了制作一个浮动操作按钮需要做的事情,这个按钮可以在屏幕的任何地方拖动,只要它在父窗口小部件中。
在这个博客中,我们将探索 Flutter 的拖动浮动按钮。我们将看到如何实现一个演示程序的拖曳浮动行动按钮,并显示如何创建您的 Flutter 应用程序。
简介 下面的演示视频显示了如何创建一个可拖动的漂浮动作按钮在 Flutter。它显示了如何拖动浮动行动按钮将在您的 Flutter 应用程序的工作。它显示当代码成功运行时,用户将一个浮动操作按钮拖动到屏幕周围的任何地方,只要它在父窗口小部件中。它会显示在你的设备上。
如何实现 dart 文件中的代码 你需要分别在你的代码中实现它:
在 lib 文件夹中创建一个名为 main.dart 的新 dart 文件。
首先,我们将创建一个 Globalkey,并将其命名为 _parentKey
1 final GlobalKey _parentKey = GlobalKey();
在正文中,我们将添加一个具有高度和宽度的 Container 小部件。它是子属性,我们将添加 Stack 小部件。在这个小部件中,我们将添加一个键、文本和一个 DraggableFloatingActionButton ()。在按钮内部,我们将添加一个具有高度和宽度的容器。在其子属性中添加图像。此外,我们还将添加 initialOffset、父键和 onPressed。我们将深入定义下面的代码。
1
2
3
4
5
6
7
8
9
10
11
12
13
14
15
16
17
18
19
20
21
22
23
24
25
26
27
28
29
30
Container( width: 300 , height: 300 , child: Stack( key: _parentKey, children: [ Container(color: Colors.cyan), Center( child: const Text( "FlutterDev's.com" , style: const TextStyle(color: Colors.white, fontSize: 24 ), ), ), DraggableFloatingActionButton( child: Container( width: 60 , height: 60 , decoration: ShapeDecoration( shape: CircleBorder(), color: Colors.white, ), child: Image.asset("assets/logo.png" ), ), initialOffset: const Offset(120 , 70 ), parentKey: _parentKey, onPressed: () {}, ), ], ), )
创建一个名为 draggable_floating_action_button.dart 的代码文件。
我们将为这样的小部件创建一个类。我们需要处理的主要问题是使按钮在指针之后可拖动的能力。可以使用的小部件之一是监听器,它可以识别指针移动事件并给出移动细节。基本上,按钮应该作为侦听器的子级进行包装。
Listener 小部件具有 onPointerMove 争用,可以利用该争用来传递一个回调,该回调在指针移动时将被考虑。回调函数应该有一个边界 PointerMoveEvent,其中包含 x 和 y 标题中的开发增量(增量)。Dx 和 delta。).捕获物的偏移量应该通过移动三角洲来刷新。
下面是制作可拖动浮动操作按钮的类。它有几个争论,包括子,initialOffset,和 onPressed。子小部件是利用依赖于当前偏移量的定位小部件交付的。此外,它还被包装为监听器小部件的子部件。此外,还有一个策略 _updatePosition ,根据移动的增量刷新当前的偏移量。
1
2
3
4
5
6
7
8
9
10
11
12
13
14
15
16
17
18
19
20
21
22
23
24
25
26
27
28
29
30
31
32
33
34
35
36
37
38
39
40
41
42
43
44
45
46
47
48
49
50
51
52
53
54
55
56
57
58
59
60
61
62
63
64
65
class DraggableFloatingActionButton extends StatefulWidget final Widget child; final Offset initialOffset; final VoidCallback onPressed; DraggableFloatingActionButton({ required this .child, required this .initialOffset, required this .onPressed, }); @override State<StatefulWidget> createState() => _DraggableFloatingActionButtonState(); } class _DraggableFloatingActionButtonState extends State <DraggableFloatingActionButton > bool _isDragging = false ; late Offset _offset; @override void initState() { super .initState(); _offset = widget.initialOffset; } void _updatePosition(PointerMoveEvent pointerMoveEvent) { double newOffsetX = _offset.dx + pointerMoveEvent.delta.dx; double newOffsetY = _offset.dy + pointerMoveEvent.delta.dy; setState(() { _offset = Offset(newOffsetX, newOffsetY); }); } @override Widget build(BuildContext context) { return Positioned( left: _offset.dx, top: _offset.dy, child: Listener( onPointerMove: (PointerMoveEvent pointerMoveEvent) { _updatePosition(pointerMoveEvent); setState(() { _isDragging = true ; }); }, onPointerUp: (PointerUpEvent pointerUpEvent) { print ('onPointerUp' ); if (_isDragging) { setState(() { _isDragging = false ; }); } else { widget.onPressed(); } }, child: widget.child, ), ); } }
您需要向父部件添加一个键,并将其传递给 DraggableFloatingActionButton 部件。您可以从 currentContext 属性中获得 RenderBox,该属性具有 findRenderObject 策略。然后,在这一点上,您可以从 RenderBox 的 size 属性获得父级的大小。您应该谨慎,因为应该在构建树之后调用 findRenderObject 技术。随后,您需要利用 WidgetsBinding 的 addPostFrameCallback 来调用它。
技术的 _updatePosition 也应该改变。如果新的偏移量小于最小偏移量,则该值必须设置为最小偏移量。如果新的偏移量比最大偏移量更值得注意,则该值必须设置为最大偏移量。对于 x 轴和 y 轴都需要这样做。
1
2
3
4
5
6
7
8
9
10
11
12
13
14
15
16
17
18
19
20
21
22
23
24
25
26
27
28
29
30
31
32
33
34
35
36
37
38
39
40
41
42
43
44
45
46
47
48
49
50
51
52
53
54
55
56
57
58
59
60
61
62
63
64
65
66
67
68
69
70
71
72
73
74
75
76
77
78
79
80
81
82
83
84
85
86
87
88
89
90
91
92
93
94
95
96
97
98
99
100
101
102
103
104
105
106
class DraggableFloatingActionButton extends StatefulWidget final Widget child; final Offset initialOffset; final VoidCallback onPressed; DraggableFloatingActionButton({ required this .child, required this .initialOffset, required this .onPressed, }); @override State<StatefulWidget> createState() => _DraggableFloatingActionButtonState(); } class _DraggableFloatingActionButtonState extends State <DraggableFloatingActionButton > final GlobalKey _key = GlobalKey(); bool _isDragging = false ; late Offset _offset; late Offset _minOffset; late Offset _maxOffset; @override void initState() { super .initState(); _offset = widget.initialOffset; WidgetsBinding.instance?.addPostFrameCallback(_setBoundary); } void _setBoundary(_) { final RenderBox parentRenderBox = widget.parentKey.currentContext?.findRenderObject() as RenderBox; final RenderBox renderBox = _key.currentContext?.findRenderObject() as RenderBox; try { final Size parentSize = parentRenderBox.size; final Size size = renderBox.size; setState(() { _minOffset = const Offset(0 , 0 ); _maxOffset = Offset( parentSize.width - size.width, parentSize.height - size.height ); }); } catch (e) { print ('catch: $e ' ); } } void _updatePosition(PointerMoveEvent pointerMoveEvent) { double newOffsetX = _offset.dx + pointerMoveEvent.delta.dx; double newOffsetY = _offset.dy + pointerMoveEvent.delta.dy; if (newOffsetX < _minOffset.dx) { newOffsetX = _minOffset.dx; } else if (newOffsetX > _maxOffset.dx) { newOffsetX = _maxOffset.dx; } if (newOffsetY < _minOffset.dy) { newOffsetY = _minOffset.dy; } else if (newOffsetY > _maxOffset.dy) { newOffsetY = _maxOffset.dy; } setState(() { _offset = Offset(newOffsetX, newOffsetY); }); } @override Widget build(BuildContext context) { return Positioned( left: _offset.dx, top: _offset.dy, child: Listener( onPointerMove: (PointerMoveEvent pointerMoveEvent) { _updatePosition(pointerMoveEvent); setState(() { _isDragging = true ; }); }, onPointerUp: (PointerUpEvent pointerUpEvent) { print ('onPointerUp' ); if (_isDragging) { setState(() { _isDragging = false ; }); } else { widget.onPressed(); } }, child: Container( key: _key, child: widget.child, ), ), ); } }
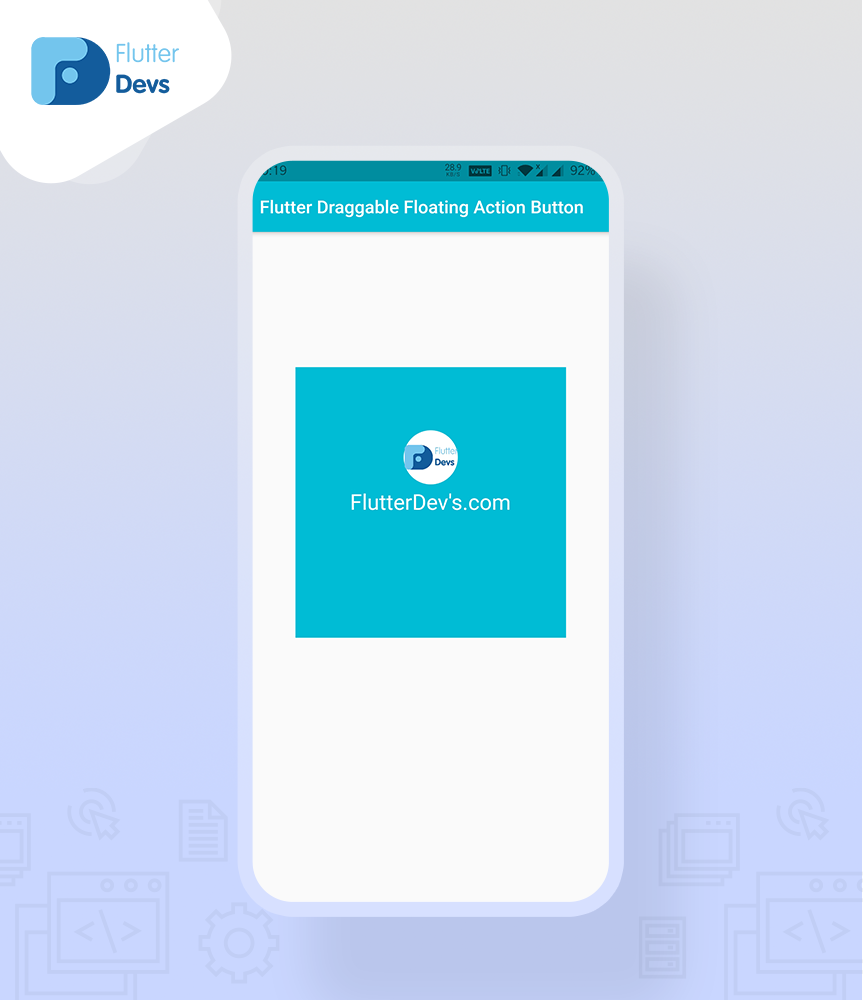
当我们运行应用程序时,我们应该得到屏幕的输出,就像下面的屏幕截图一样。
全部代码 1 2 3 4 5 6 7 8 9 10 11 12 13 14 15 16 17 18 19 20 21 22 23 24 25 26 27 28 29 30 31 32 33 34 35 36 37 38 39 40 41 42 43 44 45 46 47 48 49 50 51 52 53 54 55 56 57 58 59 60 61 62 63 64 65 66 67 68 69 70 import 'package:flutter/cupertino.dart' ;import 'package:flutter/material.dart' ;import 'package:flutter_draggable_floating/draggable_floating_action_button.dart' ;import 'package:flutter_draggable_floating/splash_screen.dart' ;void main() => runApp(MyApp());class MyApp extends StatelessWidget @override Widget build(BuildContext context) { return MaterialApp( debugShowCheckedModeBanner: false , home: Splash(), ); } } class DraggableFloatingActionButtonDemo extends StatelessWidget final GlobalKey _parentKey = GlobalKey(); @override Widget build(BuildContext context) { return new Scaffold( appBar: AppBar( automaticallyImplyLeading: false , title: const Text('Flutter Draggable Floating Action Button' ), backgroundColor: Colors.cyan, ), body: Column( children: [ Container( height: 150 , ), Container( width: 300 , height: 300 , child: Stack( key: _parentKey, children: [ Container(color: Colors.cyan), Center( child: const Text( "FlutterDev's.com" , style: const TextStyle(color: Colors.white, fontSize: 24 ), ), ), DraggableFloatingActionButton( child: Container( width: 60 , height: 60 , decoration: ShapeDecoration( shape: CircleBorder(), color: Colors.white, ), child: Image.asset("assets/logo.png" ), ), initialOffset: const Offset(120 , 70 ), parentKey: _parentKey, onPressed: () {}, ), ], ), ) ], ), ); } }
结语 在这篇文章中,我已经解释了可拖动浮动按钮的基本结构,您可以根据自己的选择修改这个代码。这是一个小的介绍可拖动浮动操作按钮对用户交互从我这边,它的工作使用 Flutter。
我希望这个博客将提供给您充分的信息,尝试在您的 Flutter 项目的拖曳浮动行动按钮。我们将向您展示介绍是什么?.这就是在 Flutter 制作一个可拖动的浮动按钮的方法。从根本上讲,您可以利用 Listener 小部件来区分指针移动事件,并根据开发增量更新按钮偏移量。监听器小部件同样支持区分指针事件,除非按钮最近被拖动,否则应该在这些事件上执行按钮的活动。同样,您需要获得父按钮和按钮的大小,以防止按钮超出父按钮的范围。所以请尝试一下。
© 猫哥
往期 开源 GetX Quick Start https://github.com/ducafecat/getx_quick_start
新闻客户端 https://github.com/ducafecat/flutter_learn_news
strapi 手册译文 https://getstrapi.cn
微信讨论群 ducafecat 系列集合 译文 https://ducafecat.tech/categories/%E8%AF%91%E6%96%87/
开源项目 https://ducafecat.tech/categories/%E5%BC%80%E6%BA%90/
Dart 编程语言基础 https://space.bilibili.com/404904528/channel/detail?cid=111585
Flutter 零基础入门 https://space.bilibili.com/404904528/channel/detail?cid=123470
Flutter 实战从零开始 新闻客户端 https://space.bilibili.com/404904528/channel/detail?cid=106755
Flutter 组件开发 https://space.bilibili.com/404904528/channel/detail?cid=144262
Flutter Bloc https://space.bilibili.com/404904528/channel/detail?cid=177519
Flutter Getx4 https://space.bilibili.com/404904528/channel/detail?cid=177514
Docker Yapi https://space.bilibili.com/404904528/channel/detail?cid=130578
邮箱 ducafecat@gmail.com / 微信 ducafecat / 留言板 disqus